Getting Started with your Azure Virtual Desktop
Additional Configuration Steps
Now that you've successfully logged into your Azure Virtual Desktop, we recommend completing the following tasks:
- After logging in the first time, you will be forced to reboot your Azure Virtual Desktop one time to finish configuration. After a few minutes, please launch your Azure Virtual Desktop from the Windows App.
- Set Google Chrome as your default browser and log into Google Chrome
- Launch Google Chrome
- Click the "Set as default" button
- In the list of Apps, click on Google Chrome
- In the "Make Google Chrome your default browser" click "Set default" and close the window.
- In Chrome, click the Profile image
 .
.
-
Click Turn on sync....
Click Yes, I'm in.
- Log into Office 365 with your WFU Google Account
- Launch any Office application (Word, Excel, PowerPoint) and you will be asked to sign in.
- Enter your WFU email, and it will open a tab to log into Google. Use your WFU email and password to login.
- Log into Google Drive for Desktop (this will help you sync and transfer files between your Virtual Desktop and your Mac)
- Launch Drive for Desktop from the start menu
- Click Sign in with browser.
- Sign in with your WFU Google Account
- Install the Student Printers
Desktop Shortcuts for Your Convenience

-
Getting Started - Use this shortcut to launch this instruction page.
-
Additional Software - Use this shortcut to connect to the software packages for School of Business Students. Oracle Crystal Ball and Capital IQ are already installed.
-
Help Desk, School of Business - Use this shortcut to connect to the School of Business Help Desk portal. Here you can browse solution articles and submit a ticket if you need assistance.
-
Capital IQ Website - Use this shortcut to visit the Capital IQ website.
Crystal Ball - Use this shortcut to launch Excel with Crystal Ball enabled
Excel with Capital IQ - Use this shortcut to launch Excel with Capital IQ enabled
Accessing Files between your Mac & Azure Virtual Desktop
PLEASE NOTE: Students are encouraged to use Google Drive to transfer files between their macOS and Azure Virtual Desktop.
Utilize one of the following methods to access Google Drive on your virtual desktop.
A) Use the Google Drive web interface:
- Open any browser and navigate to drive.google.com and sign in with your WFU credentials.
- Use the web interface to upload/download files as necessary.
OR
B) Use the Google Drive Desktop App:
- Launch Drive for Desktop from the start menu
- Click Sign in with browser.
- Sign in with your WFU Google Account
You will see a Google Drive (G:) Appear on your quick access list as well as in This PC within File Explorer. You will be able to save files directly to this drive for access from other devices, as well as access files you have saved to your google drive.
Turning off your Azure Virtual Desktop
PLEASE NOTE: Your Azure Virtual Desktop will automatically shut down at 7:00 pm EST if you have not been active.
Remember to shutdown your Azure Virtual Desktop when you are not using it.
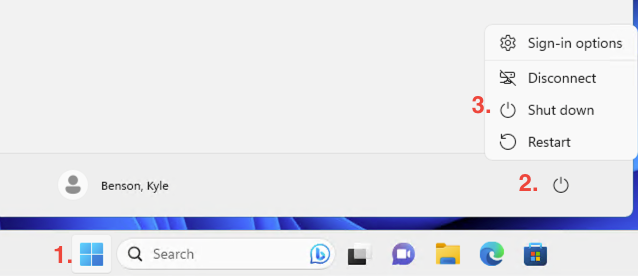
- Click the Windows icon located on the Windows taskbar
- Click the power icon on the left side of the Start Menu
- Select Shutdown to power off your Azure Virtual Desktop
- Press Command + Q to quit the 'Windows App" application
To re-launch your Azure Virtual Desktop, launch the Windows App application and Click the VM listed under “Personal Desktops for School of Business” to start a session. Starting your Azure Virtual Desktop will take approximately 2 minutes.